과거에는 사용하기 쉽고, 설계에 따른 화면구성이 용이해 여러 종류의 레이아웃을 중첩하여 UI를 구성했다.
하지만 레이아웃을 중첩해 구성하는 방법은 성능과 유지보수 측면에서 효율적이지 못한 단점이 있다.
그래서, 레이아웃을 중첩하지 않고 유연한 방법으로 뷰를 배치할 수 있는 레이아웃이 필요하다. 이 레이아웃이 바로 ConstraintLayout이다. ConstraintLayout은 뷰 위젯의 위치와 크기를 유연하게 조절 할 수 있다.
Constraint 단어의 의미는 '제약/조건' 이라는 뜻.
따라서, ConstraintLayout은 제약조건을 가지는데, 여기서의 '제약 조건'은 각 요소들의 위치와 크기를 결정하는 조건이다.
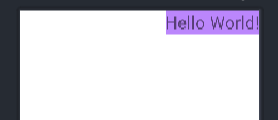
app:layout_constraintRight_toRightof = "parent"
이 뜻은 한 요소에의 right에 constraint를 주는데, 이것은 parent의 right이다라는 의미이다.
<?xml version="1.0" encoding="utf-8"?><androidx.constraintlayout.widget.ConstraintLayout xmlns:android="http://schemas.android.com/apk/res/android" xmlns:app="http://schemas.android.com/apk/res-auto" xmlns:tools="http://schemas.android.com/tools" android:layout_width="match_parent" android:layout_height="match_parent" tools:context=".MainActivity">
<TextView
android:layout_width="wrap_content"
android:layout_height="wrap_content"
android:background="@color/purple_200"
android:text="Text1"
android:textSize="30dp"
app:layout_constraintRight_toRightOf="parent"
android:id="@+id/text1"/>
<TextView
android:layout_width="wrap_content"
android:layout_height="wrap_content"
android:background="@color/purple_200"
android:text="text2" android:textSize="30dp"
app:layout_constraintLeft_toLeftOf="parent"
android:id="@+id/text2"/>
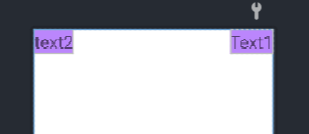
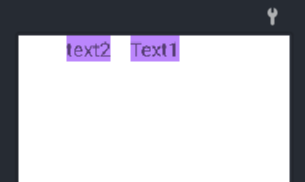
text1의 right를 parent의 right에 붙이고, text2의 left를 parent의 left에 붙여준 모습이다.
그렇다면 일렬로 서로 붙어있는 요소들의 배치는 어떻게 해야할까?
text2의 오른쪽에 text1의 왼쪽을 붙여주면 될거같다.
 <TextView
        android:layout_width="wrap_content"
        android:layout_height="wrap_content"
        android:background="@color/purple_200"
        android:text="Text1"
        android:textSize="30dp"
        app:layout_constraintRight_toRightOf="parent"
        app:layout_constraintLeft_toRightOf="@+id/text2"
        android:id="@+id/text1"/>


    <TextView
        android:layout_width="wrap_content"
        android:layout_height="wrap_content"
        android:background="@color/purple_200"
        android:text="text2"
        android:textSize="30dp"
        app:layout_constraintLeft_toLeftOf="parent"
        app:layout_constraintRight_toLeftOf="@+id/text1"
        android:id="@+id/text2"/>

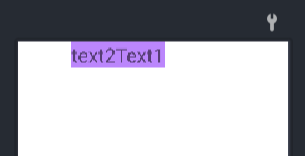
각 TextView의 id를 이용해 서로의 왼쪽과 오른쪽을 붙여주었지만 가운데의 빈공간이 발생한다.
이 text들을 붙여주려면 Chain을 사용해야한다.
ConstraintLayout Chain에는 spread, spread_inside, and packed 세가지 모델이 있다.
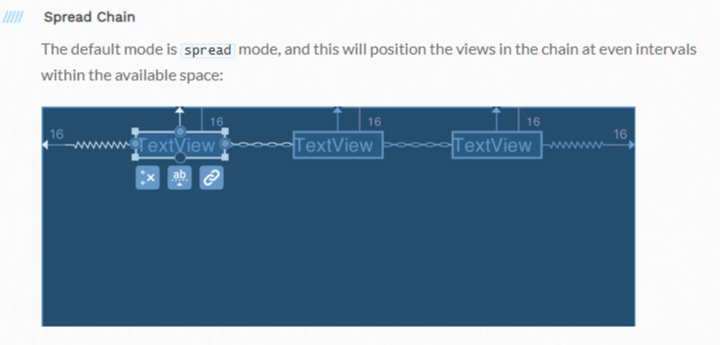
1. Spread Chain
: 기본 모드는 spread 모드이며 사용가능한 공간 내에서 동일한 간격으로 체인의 보기를 배치한다.
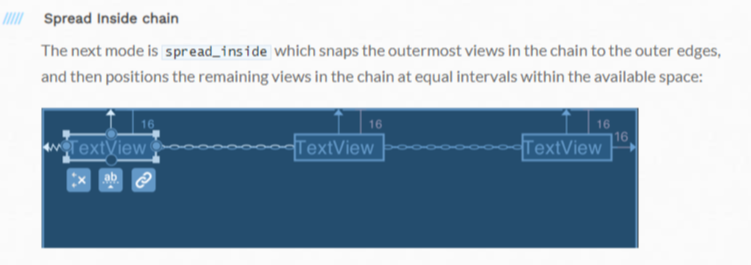
2. Spread Inside Chain
: spread_inside 체인의 가장 바깥쪽 뷰를 바깥쪽 가장자리에 스냅한 다음 사용가능한 공간 내에서 동일한 간격으로 체인의 나머지 뷰를 배치한다.
3. Packed Chain
: packed 보기를 함께 묶고(구분을 위한 약간의 여백은 제공 가능) 사용가능한 공간내에서 그룹을 중앙에 배치한다.
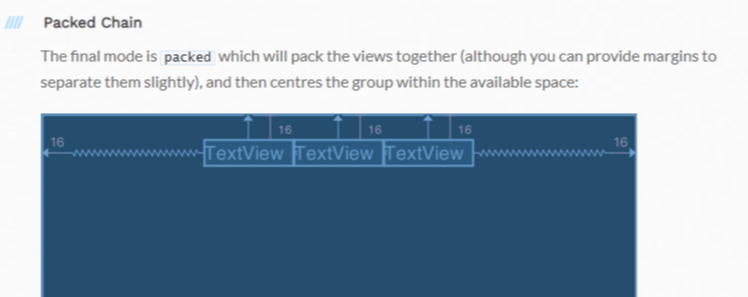
- Packed Chain 을 사용하면 bias 값을 변경하여 묶음 보기의 위치를 추가로 제어할 수 있다.
- bias의 default값은 0.5이다. 0.5보다 작으면 왼쪽으로, 크면 오른쪽으로 배치된다.
<TextView
android:layout_width="wrap_content"
android:layout_height="wrap_content"
android:background="@color/purple_200"
android:text="Text1"
android:textSize="30dp"
app:layout_constraintRight_toRightOf="parent"
app:layout_constraintLeft_toRightOf="@+id/text2"
android:id="@+id/text1"/>
<TextView
android:layout_width="wrap_content"
android:layout_height="wrap_content"
android:background="@color/purple_200"
android:text="text2" android:textSize="30dp"
app:layout_constraintHorizontal_bias="0.3"
app:layout_constraintHorizontal_chainStyle="packed"
app:layout_constraintLeft_toLeftOf="parent"
app:layout_constraintRight_toLeftOf="@+id/text1"
android:id="@+id/text2"/>
사용가능한 제약 조건 - id나 parent에 대한 참조를 취함
- layout_constraintLeft_toLeftOf
- layout_constraintLeft_toRightOf
- layout_constraintRight_toLeftOf
- layout_constraintRight_toRightOf
- layout_constraintTop_toTopOf
- layout_constraintTop_toBottomOf
- layout_constraintBottom_toTopOf
- layout_constraintBottom_toBottomOf
- layout_constraintBaseline_toBaselineOf
- layout_constraintStart_toEndOf
- layout_constraintStart_toStartOf
- layout_constraintEnd_toStartOf
- layout_constraintEnd_toEndOf
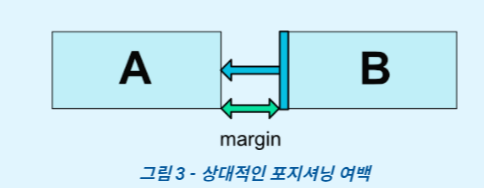
여백
- android:layout_marginStart
- android:layout_marginEnd
- android:layout_marginLeft
- android:layout_marginTop
- android:layout_marginRight
- android:layout_marginBottom
android:layout_marginRight="30dp"
앞에 packed로 연결해준 text들 사이에 margin을 통해 여백을 넣어줄 수 있다.
/* ConstraintLayout Chain 설명 */
https://constraintlayout.com/basics/create_chains.html
ConstraintLayout
Chains v2.4 alpha 7 All of the examples in this article have been created using Android Studio v2.4 alpha 7. You may see differences if you are using a different version. v1.1+ All of the examples in this article have been created using ConstraintLayout v1
constraintlayout.com
/* 공식 사이트 */
https://developer.android.com/reference/android/support/constraint/ConstraintLayout
ConstraintLayout | Android Developers
ConstraintLayout This package is part of the Android support library which is no longer maintained. The Constraint Layout support library has been superseded by the AndroidX Constraint Layout library, which is part of Jetpack. The ConstraintLayout class ha
developer.android.com
'안드로이드 > 정리' 카테고리의 다른 글
| [안드로이드] RelativeLayout (0) | 2021.09.21 |
|---|---|
| [안드로이드] LinearLayout (0) | 2021.09.19 |
| [안드로이드] invisible과 gone (0) | 2021.09.18 |
| [안드로이드] drawable의 Shape (0) | 2021.09.16 |
| [안드로이드] Intent 정리 (0) | 2021.09.02 |
![[안드로이드] LinearLayout](https://img1.daumcdn.net/thumb/R750x0/?scode=mtistory2&fname=https%3A%2F%2Fblog.kakaocdn.net%2Fdna%2FGZ1Tg%2FbtrfoRh3ObM%2FAAAAAAAAAAAAAAAAAAAAALVeDZjvu6AwbFpWHjjeWI9Pt3hGOx3OUUur0F-mo4CI%2Fimg.png%3Fcredential%3DyqXZFxpELC7KVnFOS48ylbz2pIh7yKj8%26expires%3D1764514799%26allow_ip%3D%26allow_referer%3D%26signature%3DHRabzHm9qDjoXzi8S7ZgUkifbUw%253D)
![[안드로이드] invisible과 gone](https://img1.daumcdn.net/thumb/R750x0/?scode=mtistory2&fname=https%3A%2F%2Fblog.kakaocdn.net%2Fdna%2FdRFhxT%2FbtrfphmPnS7%2FAAAAAAAAAAAAAAAAAAAAAL8_eP6uqkREBK0ICCy7Tghy38A1lQceS587s8h9NgTa%2Fimg.png%3Fcredential%3DyqXZFxpELC7KVnFOS48ylbz2pIh7yKj8%26expires%3D1764514799%26allow_ip%3D%26allow_referer%3D%26signature%3DiAovpmqqwK7VLz2CcTDY5OqAWoA%253D)
![[안드로이드] Intent 정리](https://img1.daumcdn.net/thumb/R750x0/?scode=mtistory2&fname=https%3A%2F%2Fblog.kakaocdn.net%2Fdna%2FnXuYq%2FbtrdJ2KMrIm%2FAAAAAAAAAAAAAAAAAAAAABMPqFr2PoK4zvQWIPujOFHBaDNjz3HODq58iriIh8mY%2Fimg.png%3Fcredential%3DyqXZFxpELC7KVnFOS48ylbz2pIh7yKj8%26expires%3D1764514799%26allow_ip%3D%26allow_referer%3D%26signature%3D33b4qlVut1SuLMpuVR71AyBCeGY%253D)