Linearlayout은 Linear(선형의)라는 단어대로 View를 수평 또는 수작으로 배치할 수 있는 레이아웃이다.
1. orientation
linearlayout의 자식 view들은 orientation 속성을 통해 배치 방향을 결정할 수 있다.
또한 LinearLayout의 자식들은 중첩되지 않고, 지정한 방향으로 쌓이는 stacked 형태로 표시된다.
android: orientation="vertical"        // 수직
android: orientation="horizontal"    // 수평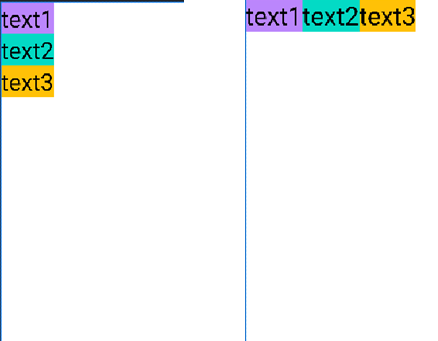
2. gravity VS layout_gravity
화면에 요소들을 배치할 때 제공하는 정렬기능이다.
| layout_gravity | 부모 레이아웃의 공간에서의 위치를 정렬. 레이아웃 전체가 움직인다. |
|---|---|
| gravity | 레이아웃 안의 내용물을 정렬한다. |
1) `layout_gravity`
부모 클래스가 LinearLayout 이고, 크기는 앱화면의 전체를 차지하고 있기때문에 앱화면 전체범위에 자식뷰들이 이동할 수 있다.

<?xml version\="1.0" encoding\="utf-8"?>
<LinearLayout xmlns:android\="[http://schemas.android.com/apk/res/android](http://schemas.android.com/apk/res/android)"
android:layout\_width\="match\_parent"
android:layout\_height\="match\_parent"
android:background\="@color/white"
android:orientation\="vertical"\>
<Button
android:id\="@+id/button1"
android:layout\_width\="wrap\_content"
android:layout\_height\="wrap\_content"
android:layout\_gravity\="left"
android:layout\_marginBottom\="10dp"
android:background\="#AAA8A8"
android:text\="left"
android:textSize\="50dp" />
<Button
android:id\="@+id/button2"
android:layout\_width\="wrap\_content"
android:layout\_height\="wrap\_content"
android:layout\_gravity\="center"
android:layout\_marginBottom\="10dp"
android:background\="#AAA8A8"
android:text\="center"
android:textSize\="50dp" />
<Button
android:id\="@+id/button3"
android:layout\_width\="wrap\_content"
android:layout\_height\="wrap\_content"
android:layout\_gravity\="right"
android:layout\_marginBottom\="10dp"
android:background\="#AAA8A8"
android:text\="right"
android:textSize\="50dp" />
<Button
android:id\="@+id/button4"
android:layout\_width\="wrap\_content"
android:layout\_height\="wrap\_content"
android:layout\_gravity\="top"
android:layout\_marginBottom\="10dp"
android:background\="#AAA8A8"
android:text\="top"
android:textSize\="50dp" />
<Button
android:id\="@+id/button5"
android:layout\_width\="wrap\_content"
android:layout\_height\="wrap\_content"
android:layout\_gravity\="end"
android:layout\_marginBottom\="10dp"
android:background\="#AAA8A8"
android:text\="end"
android:textSize\="50dp" />
<Button
android:id\="@+id/button6"
android:layout\_width\="wrap\_content"
android:layout\_height\="wrap\_content"
android:layout\_gravity\="bottom"
android:layout\_marginBottom\="10dp"
android:background\="#AAA8A8"
android:text\="bottom"
android:textSize\="50dp" />
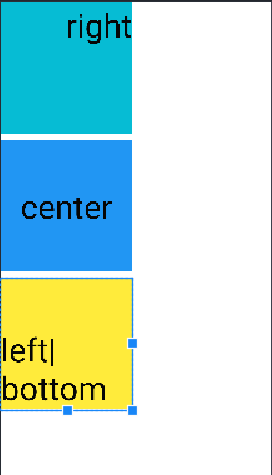
</LinearLayout\> 2) `gravity`
gravity를 사용하면 Button의 내용물만 이동하는 것을 볼 수 있다. 두가지 이상의 속성을 같이 사용하려면 ` | `를 이용한다.
<?xml version\="1.0" encoding\="utf-8"?>
<LinearLayout xmlns:android\="[http://schemas.android.com/apk/res/android](http://schemas.android.com/apk/res/android)"
android:layout\_width\="match\_parent"
android:layout\_height\="match\_parent"
android:background\="@color/white"
android:orientation\="vertical"\>


<Button
android:layout\_width\="200dp"
android:layout\_height\="200dp"
android:gravity\="right"
android:layout\_marginBottom\="10dp"
android:background\="#00BCD4"
android:text\="right"
android:textSize\="50dp" />

<Button
android:layout\_width\="200dp"
android:layout\_height\="200dp"
android:gravity\="center"
android:layout\_marginBottom\="10dp"
android:background\="#2196F3"
android:text\="center"
android:textSize\="50dp" />

<Button
android:layout\_width\="200dp"
android:layout\_height\="200dp"
android:gravity\="left|bottom"
android:layout\_marginBottom\="10dp"
android:background\="#FFEB3B"
android:text\="left|bottom"
android:textSize\="50dp" />

</LinearLayout\>
| 속성값 | 설명 |
|---|---|
| top | 대상 객체를 크기 변화없이 위쪽 끝에 배치하기 |
| bottom | 대상 객체를 **크기 변화없이 아래쪽 끝에 배치하기하기** |
| left | 대상 객체를 **크기 변화없이 왼쪽 끝에 배치하기** |
| right | 대상 객체를 **크기 변화없이 오른쪽 끝에 배치하기** |
| center | 대상 객체를 **크기 변화없이 수직 방향의 중앙에 배치하기** |
| center_vertical | 대상 객체를 **크기 변화없이 수직 방향의 중앙에 배치하기** |
| center_horizontal | 대상 객체를 **크기 변화없이** 수평 방향의 중앙에 배치하기 |
| fill | 대상 객체의 수직 방향과 수평 방향으로 여유 공간만큼 맞추어 확장한다 |
| fill_vertical | 대상 객체의 수직 방향으로 여유공간만큼 맞추어 확장한다 |
| fill_horizontal | 대상 객체의 수평 방향으로 여유공간만큼 맞추어 확장한다 |
| clip_vertical | 대상 객체의 상하 길이가 여유공간보다 클 경우 남는 부분 잘라내기 ex1) top|clip_vertical 경우, 아래쪽에 남는 부분 잘라냄 ex2) bottom}clip_vertical 경우, 위쪽에 남는 부분 잘라냄 ex3) center_vertical}clip_vertical 경우, 위쪽과 아래쪽에 남는 부분 잘라냄 |
| clip_horizontal | 대상 객체의 좌우 길이가 여유공간보다 클 경우 남는 부분 잘라내기 ex1) right}clip_horizontal 경우, 왼쪽에 남는 부분 잘라냄 ex2) left|clip_horizontal 경우, 오른쪽에 남는 부분 잘라냄 ex3) center_horizontal|clip_horizontal 경우, 왼쪽과 오른쪽에 남는 부분 잘라냄 |
- orientation이 vertical 이냐 horizontal이냐에 따라 적용되는 방향도 달라진다.
3. weight와 weightSum
1) weight
- 자식 뷰에 가중치를 적용한다. 기본값은 0
- 전체에 대한 비율을 나누어 배치해준다.
- 가중치가 적용되는 방향의 값이 "0dp" 여야한다.

- 수평(horizontal)으로 비율을 나눌때 : layout_width 을 "0dp"로 만들어준다.
- 수직(vertical)으로 비율을 나눌때 : layout_height 을 "0dp"로 만들어준다.
<LinearLayout
android:layout_width="match_parent"
android:layout_height="wrap_content"
android:orientation="horizontal">
	<TextView
        android:layout\_weight="1"
        android:layout\_width="0dp"
        android:layout\_height="wrap\_content"
        android:background="#3F51B5"
        android:text="100"
        android:textSize="20dp" />

    <TextView
        android:layout\_weight="1"
        android:layout\_width="0dp"
        android:layout\_height="wrap\_content"
        android:background="#FFC107"
        android:text="200"
        android:textSize="20dp" />

    <TextView
        android:layout\_weight="1"
        android:layout\_width="0dp"
        android:layout\_height="wrap\_content"
        android:background="#3F51B5"
        android:text="300"
        android:textSize="20dp" />
2) weightSum : 나눌 비율을 미리 지정해준다.
- 자식 뷰에 차지하려는 비율을 `layout_weight` 로 정의 해주어야한다.
- 자식 뷰로 꼭 다 채울 필요가 없다. 빈공간으로 둬도 됨.
ex) `weightSum = 5` 라면 전체를 5로 나눈다.
-> 자식뷰에 `layout_weight = 3`, `layout_weight = 1`, `layout_weight=1` 이면 3:1:1 비율로 나눔.

<TextView
android:layout_weight="3"
android:layout_width="wrap_content"
android:layout_height="0dp"
android:background="#3F51B5"
android:text="100"
android:textSize="20dp" />

<TextView
android:layout_weight="1"
android:layout_width="wrap_content"
android:layout_height="0dp"
android:background="#FFC107"
android:text="200"
android:textSize="20dp" />

<TextView
android:layout_weight="1"
android:layout_width="wrap_content"
android:layout_height="0dp"
android:background="#3F51B5"
android:text="300"
android:textSize="20dp" />
예제) 전체를 세로로 3등분하고, 나눈 3등분을 각각 가로로 3등분하기
LinearLayout을 vertical로 3등분 해준다음 각 LinearLayout안에 TextView를 3개를 만들어 가중치를 1로 둔다.

<LinearLayout xmlns:android="[http://schemas.android.com/apk/res/android](http://schemas.android.com/apk/res/android)"
xmlns:tools="[http://schemas.android.com/tools](http://schemas.android.com/tools)"
android:layout\_width="match\_parent"
android:layout\_height="match\_parent"
android:orientation="horizontal">

<LinearLayout
android:layout\_width="0dp"
android:layout\_height="match\_parent"
android:orientation="vertical"
android:layout\_weight="1">

<TextView
android:layout\_width="match\_parent"
android:layout\_height="0dp"
android:background="@color/purple\_200"
android:layout\_weight="1"/>

<TextView
android:layout\_width="match\_parent"
android:layout\_height="0dp"
android:background="@color/teal\_200"
android:layout\_weight="1"/>

<TextView
android:layout\_width="match\_parent"
android:layout\_height="0dp"
android:background="@color/purple\_500"
android:layout\_weight="1"/>

</LinearLayout>

<LinearLayout
android:layout\_width="0dp"
android:layout\_height="match\_parent"
android:orientation="vertical"
android:layout\_weight="1">

<TextView
android:layout\_width="match\_parent"
android:layout\_height="0dp"
android:background="@color/purple\_500"
android:layout\_weight="1"/>

<TextView
android:layout\_width="match\_parent"
android:layout\_height="0dp"
android:background="@color/purple\_200"
android:layout\_weight="1"/>

<TextView
android:layout\_width="match\_parent"
android:layout\_height="0dp"
android:background="@color/teal\_200"
android:layout\_weight="1"/>
</LinearLayout>

<LinearLayout
android:layout\_width="0dp"
android:layout\_height="match\_parent"
android:orientation="vertical"
android:layout\_weight="1">

<TextView
android:layout\_width="match\_parent"
android:layout\_height="0dp"
android:background="@color/teal\_200"
android:layout\_weight="1"/>

<TextView
android:layout\_width="match\_parent"
android:layout\_height="0dp"
android:background="@color/purple\_500"
android:layout\_weight="1"/>

<TextView
android:layout\_width="match\_parent"
android:layout\_height="0dp"
android:background="@color/purple\_200"
android:layout\_weight="1"/>
</LinearLayout>

</LinearLayout>
4. baselineAligned
뷰들을 정렬하기 위해 기준점을 설정해 그 기준으로 평형을 맞춘다.
특별히 설정해주지 않아도 기본값이 true로 설정되어 있다.
'안드로이드 > 정리' 카테고리의 다른 글
| [안드로이드] FrameLayout (0) | 2021.09.22 |
|---|---|
| [안드로이드] RelativeLayout (0) | 2021.09.21 |
| [안드로이드] invisible과 gone (0) | 2021.09.18 |
| [안드로이드] ConstraintLayout (0) | 2021.09.18 |
| [안드로이드] drawable의 Shape (0) | 2021.09.16 |
![[안드로이드] FrameLayout](https://img1.daumcdn.net/thumb/R750x0/?scode=mtistory2&fname=https%3A%2F%2Fblog.kakaocdn.net%2Fdna%2FbPCdW9%2FbtrfHcR7RfC%2FAAAAAAAAAAAAAAAAAAAAADnuJpBjaKMxrnDKfZarqP1vG_9UD3xbsbNimvJI_Qs8%2Fimg.png%3Fcredential%3DyqXZFxpELC7KVnFOS48ylbz2pIh7yKj8%26expires%3D1764514799%26allow_ip%3D%26allow_referer%3D%26signature%3DwNTbhQKFCwDioEDntm1zL9n0%252BAA%253D)
![[안드로이드] RelativeLayout](https://img1.daumcdn.net/thumb/R750x0/?scode=mtistory2&fname=https%3A%2F%2Fblog.kakaocdn.net%2Fdna%2Fcfj6Hi%2FbtrfuQiyEQE%2FAAAAAAAAAAAAAAAAAAAAAK9eX8LOsH3TfNan24XfGrTOI4sn3aLdGuaXVsK-DW_c%2Fimg.png%3Fcredential%3DyqXZFxpELC7KVnFOS48ylbz2pIh7yKj8%26expires%3D1764514799%26allow_ip%3D%26allow_referer%3D%26signature%3DJzyPJgviGlHSIkZbpRhQeDd2fGU%253D)
![[안드로이드] invisible과 gone](https://img1.daumcdn.net/thumb/R750x0/?scode=mtistory2&fname=https%3A%2F%2Fblog.kakaocdn.net%2Fdna%2FdRFhxT%2FbtrfphmPnS7%2FAAAAAAAAAAAAAAAAAAAAAL8_eP6uqkREBK0ICCy7Tghy38A1lQceS587s8h9NgTa%2Fimg.png%3Fcredential%3DyqXZFxpELC7KVnFOS48ylbz2pIh7yKj8%26expires%3D1764514799%26allow_ip%3D%26allow_referer%3D%26signature%3DiAovpmqqwK7VLz2CcTDY5OqAWoA%253D)
![[안드로이드] ConstraintLayout](https://img1.daumcdn.net/thumb/R750x0/?scode=mtistory2&fname=https%3A%2F%2Fblog.kakaocdn.net%2Fdna%2FcnJVqs%2Fbtrfp1Rla2L%2FAAAAAAAAAAAAAAAAAAAAAMWzXeiEu0c4nQoqjprw4W9lsnqdtoNUPNTZh2yh1aYR%2Fimg.png%3Fcredential%3DyqXZFxpELC7KVnFOS48ylbz2pIh7yKj8%26expires%3D1764514799%26allow_ip%3D%26allow_referer%3D%26signature%3DeIj6v2mElnTSRw7tZwbpLYkvzVk%253D)